
These days it is common to work with a Local Area Network (LAN) formed by two or more Windows 10/7 computers. Local networks allow people to successfully share files and folders with other authenticated users. Also, it enables you to share the folders without any security issues. Providing access to computer folders or files over a local area network is straightforward. All you need to do is enable the file-sharing option on Windows operating system. While it is quite easy and useful to share your files with other Windows users on the local network, sometimes it shows an error message, your folder can’t be shared.
When this happens, you go into panic mode and want to resolve the error as soon as possible. Do not feel tense when you see the error. Here in this article, we provide you with solutions to fix the error, your folder can’t be shared on Windows 10/7.
Table of Contents
Why Does the “Your Folder Can’t Be Shared” Error Occur?
There are several reasons for your folder cannot be shared error to occur. In some cases, the error can be a false positive, meaning that your folder does get shared, but you just get an error message. However, this is not always the case, as you can really have a problem.
Here are some of the reasons when you are bound to face issues with Windows 10 network sharing not working while sharing the files or folders over a local area network.
Third-party Antivirus: In most cases, the issue can be caused by the third-party antivirus that you installed on your system. Antivirus software imposes certain restrictions on your system preventing you from utilizing certain Windows features and one is sharing a file or folder over LAN. Folder not sharing Windows 10 error can occur due to the third-party antivirus program.
File Sharing Settings: Another reason for the error to occur is the advanced file-sharing settings on your computer. The user account you are using might not have the permission to share the folder with everyone, thus Windows 10 can’t share the folder on network error can occur.
What to Do when Your Folder Is not Sharing on Windows 10
To successfully share files or folders over a network, you can apply the solutions given below and see if they work for you or not.
Solution 1 – Enable File Sharing
Sometimes an error occurred while trying to share, access is denied is because the file-sharing is disabled on your Windows computer. To fix the issue, follow the steps below.
Open Control Panel on your device and double-click on Network and Sharing Center. Active networks page opens, here click on the Connections, Wi-Fi Status tab opens.
Now, click on Properties and verify if the File and Printer Sharing for Microsoft Networks box is checked. If not, then check the box and click the ok button to save the changes.
Once you are done, you can share files and folders without the error.
Solution 2 – Use Advanced Sharing
To fix the error Windows 10 can’t share folder on the network is to use advanced sharing. Here are the steps to follow.
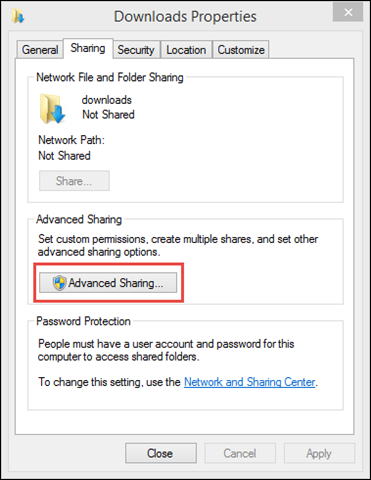
- Select the folder you want to share on LAN, right-click on it, and choose properties.
- Now, go to Sharing tab and select Advanced Sharing.
- Tick the box beside the Share this folder option and hit the Permission button at the bottom.
- Select everyone to give access to the shared folder and under the Permission for Everyone tab, enable full control, change, and read options. Click on Apply and then Ok to save changes.
However, if you want to share the folder with some users only, then click on Add > Advanced > Find Now, choose the users, and click Ok. Once done, select the user under the Permissions tab, allow full control, change, and read, and click on Apply, then Ok to save changes.
It will help resolve the error your folder can’t be shared on Windows 10/7.
Solution 3 – Turn Off Password Protected Sharing
Sharing or transferring the folders or files from your computer to another one on the same network requires a password. So, if you turn off the password-protected sharing, it can help resolve the error windows 10 can’t share folder on the network. However, removing the password protection allows unauthorized users to access your shared folders.
Here are the steps to turn off password-protected sharing.
- Open the control panel and click on Network and Sharing Centre.
- Now, hit the Change Advanced Sharing Settings button and choose All Networks to expand the settings.
- Select the setting Turn off password sharing and click on the Save changes button.
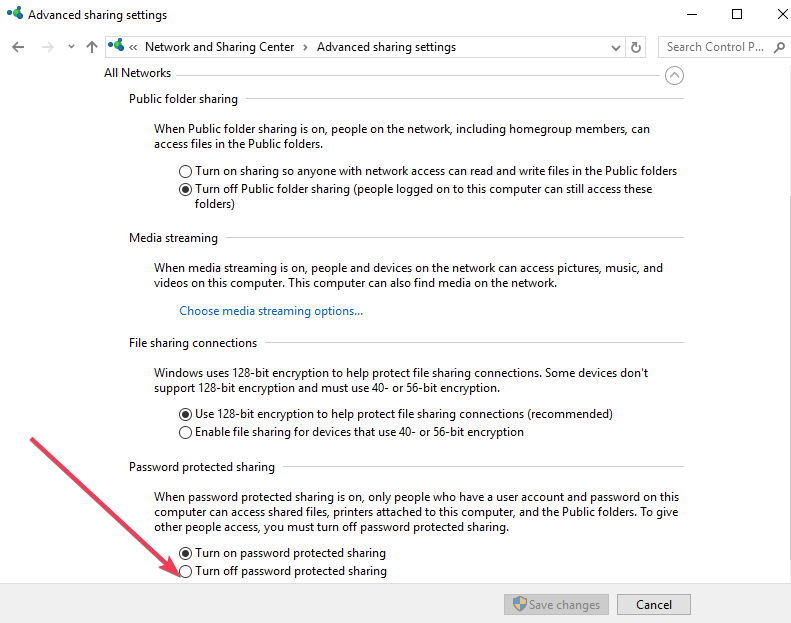
This will disable password protection and you can now share your files without the error message.
Solution 4 – Enable File and Printer Settings
At times, an error occurred while trying to share access is denied because your network profile is denying the file and printer sharing. You need to enable file and printer sharing to solve the problem. Follow the steps here.
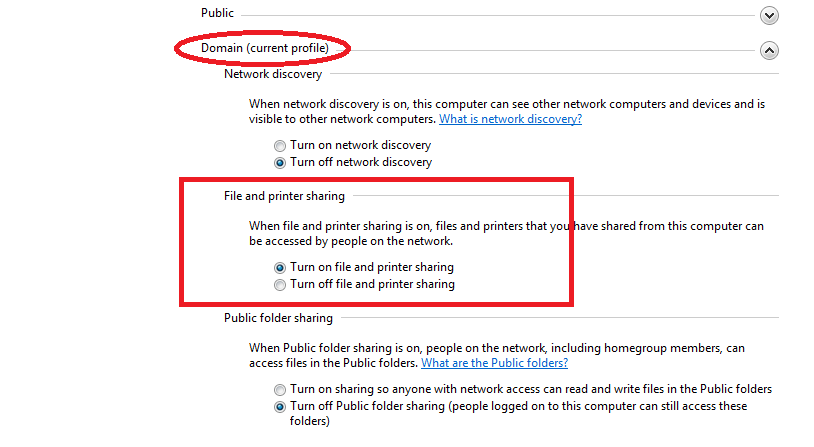
- Go to Control Panel and select Network and Sharing Center.
- Next, click on Change advanced sharing settings on the right-side panel.
- Now, check the button Turn on file and printer sharing and click on Save changes.
- Close the Control Panel window and restart your computer.
Solution 5 – Disable Antivirus Software
The error folder not sharing Windows 10 can occur due to a third-party antivirus program. To resolve the error, disable the program. However, there are certain risks involved when your computer is connected to the internet without antivirus.
To disable the antivirus software, open the antivirus app, and turn it off by enabling the temporarily disabled option.
Now, check whether you can share the folders. Once done, immediately turn the antivirus program on so your computer is safe.
Solution 6 – Reinstall Windows
When all the above methods fail to work to resolve your folder can’t be shared error, the only option is to reinstall your Windows.
However, backup all your important files and folder before you proceed or use data recovery software after reinstalling the Windows.
To reinstall Windows 10 and 8, use Refresh your PC or Reset your PC options built-in. These options quickly reinstall Windows, automatically saving and restoring all your data.
For Windows 7 and lower versions, you need to use the Windows installation disc and restart your computer. Complete the installation process answering all the questions.
How to Share Folder Securely
When you share a folder over the LAN in windows, the folder is public, to all the users which is convenient. However, if you are sharing sensitive information the shared file or folder is only supposed to be viewed, edited, copied, and printed by authorized users, thus sharing those files over a local area network would be a risky thing to do.
So, to share folders securely, use Shared Folder Protector software and share folders without any worries. Let’s take a look at the main functions of the software.
- Click “Add Folder” to add the folder you want to share and encrypt.
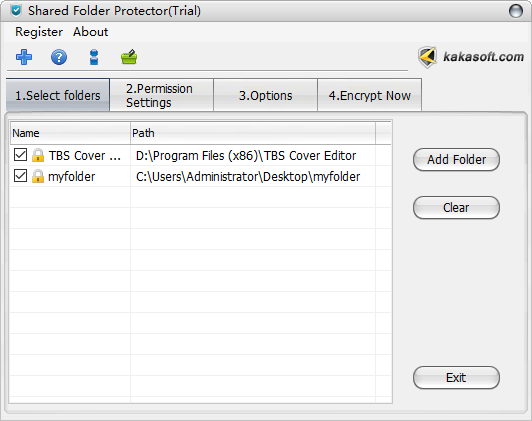
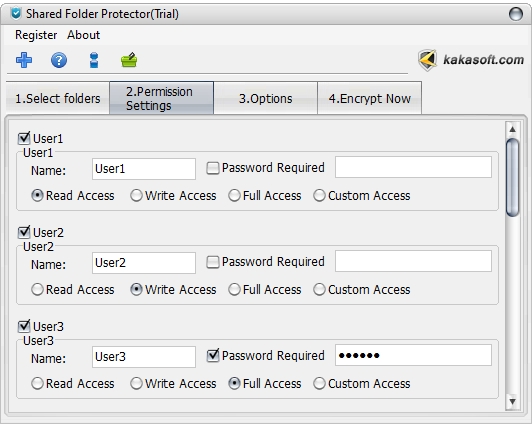
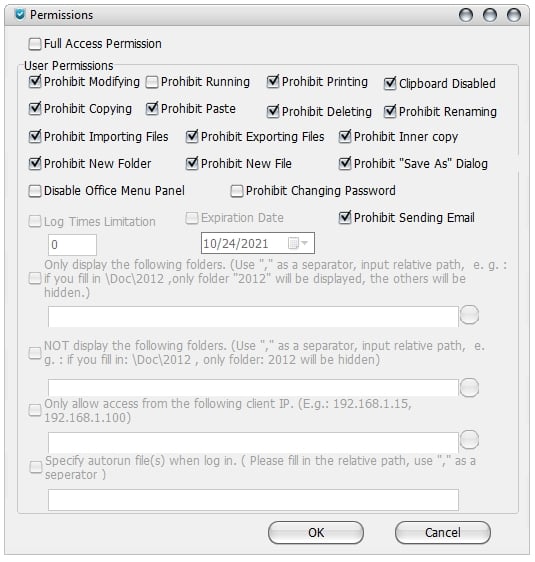
2. The software provides a function to make specific permission settings for a certain user. You can set up different permissions and user names and passwords for up to ten users.
3. After setting up the user permissions and encrypting the shared folder, you will find the file in the folder is hidden.
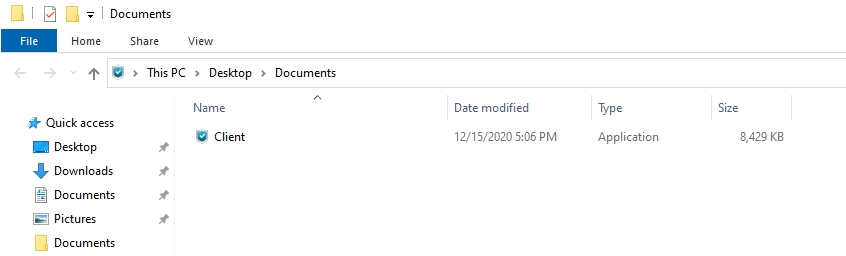
4. Now double click the “Client” open the login interface. Enter the username and password to log in then you can browse the files.

Conclusion
Your folder can’t be shared error is not a severe issue as compared to other Windows errors. However, it irritates you when you cannot share the folders. To solve the error, the above-mentioned solutions work great. In order to share folders more securely, please use Shared Folder Protector. In addition to this, removing the current Homegroup and creating a new one can also resolve the error.