Windows 10 allows you to encrypt data with EFS, Encrypted File System. This feature becomes extremely important if you have stored sensitive and confidential data in your Windows PC/laptop. However, many Windows 10 users encounter one problem while trying to encrypt some of the files is grayed-out problem.
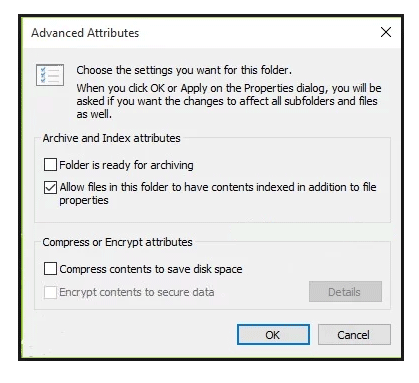
So, if you can’t encrypt content to secure and protect data because the content is showing greyed out, worry not; there are ways to encrypt such data as well.
It is understood that you will want to encrypt some of the files/folders in your PC primarily because they may contain confidential and sensitive information, as we mentioned earlier. And EFS is a fantastic way to secure data. Keep reading to understand why your files may show as greyed out and how to protect such data.
Table of Contents
Why Is the Encrypt Option Greyed Out?
If you have observed greyed out encrypt folders in your Windows 10 computer, first take a look at the following two points:
First, are you using Windows 10 home edition?
Please note that EFS Encrypting File System is not available in the Windows Home Edition. You have to upgrade the Windows to Education, Enterprise, or Pro edition to be able to use EFS. If you aren’t sure about the Windows edition, press Windows Key + S. Then enter the System Information. Once it opens, you can check the OS name there. If it shows Windows home edition, then yes, you won’t be able to encrypt the files. Also, upgrading from Home to Pro isn’t possible, which means you will have to buy the Pro version.
Are you using drives other than NTFS type?
Another thing to take care of is whether your system has NTFS drives or not. Those who have Windows 10 Pro version can easily check their drives. However, if you find out that your computer is using FAT32, make sure to convert it to NTFS to be able to use EFS. To do that, go to Command Prompt. Now enter the command: convert X:/ fs:ntfs and change the letter ‘x’ by the drive’s letter. Once done, FAT32 will be converted to NTFS, allowing you to use the file encryption function.
However, if you have upgraded Windows 10 home edition to Education, Enterprise, or Pro edition and use NTFS drive, proceed with the next section.
How to Troubleshoot “Encrypt Contents to Secure Data Greyed Out” Error?
Method 1: Setting Encrypting File System to Automatic
If your Windows 10 can’t encrypt files and folders, then try setting EFS to automatic. To do that, just read the following steps, and try doing that on your own.
Step 1: First, you need to press both R and Windows keys together. Once you do that, the Run dialog will be launched. In the bar beside Open, type services.msc. After that, you need to click on the OK option.
Step 2: Now, you will have to search for Encrypt File System. Once you find it, double-click on it.
Step 3: After the Encrypt File System Properties window pops up, you will see four tabs. The one that you need to choose is the General tab. Next, scroll down a bit to Startup Type. From the menu, you need to choose Automatic. Finally, hit the OK option.
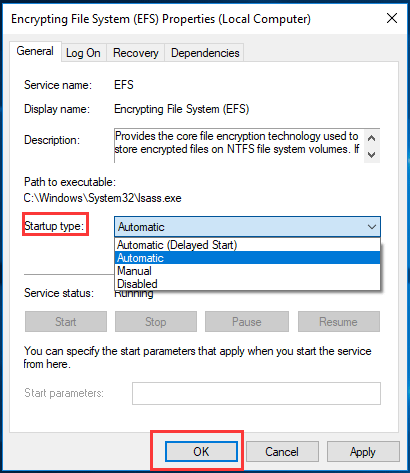
Restart your computer to check whether the problem has been rectified or not.
Method 2: Enabling EFS Through Windows Registry
If method one doesn’t work, you can try method two, enabling EFS using Windows Registry. If you don’t know how to do that, just follow the steps mentioned below.
Step 1: Just like method 1, you need to launch the RUN dialog for this method. To do that, just press the R and Windows keys together. But instead of typing services.msc, you need to type regedit. Once done, click on the OK option below.
Step 2: Registry Editor Window will open. Enter HKEY_LOCAL_MACHINE\System\CurrentControlSet\Control\FileSystem to be able to find the FileSystem.
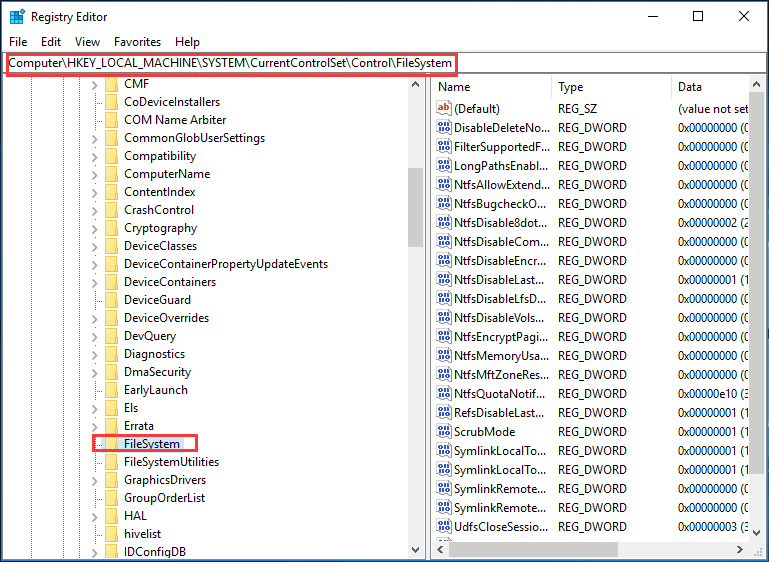
Step 3: From the menu, locate NtfsDisableEncryption. You will see it on the right. Once you find it, double-click on it.
Step 4: Edit DWORD (32-BIT) Value pop-up window will appear. Under Value data, you will find a space to edit it; please enter 0. Once done, hit the OK button.
After following all the steps, you need to restart your system. Now, check if the problem has been resolved and whether you are able to or still can’t encrypt contents to secure data. If not, proceed with the third method.
Method 3: Enabling EFS Through Command Line
For the third method, you can try enabling EFS using the command line. To be able to do that, we have shared some steps that you need to follow. Try them out:
Step 1: Open the Search Box. There type Command Prompt and hit the enter key on your keyboard. Now, select it and right-click on it. After that, you will have to select Run as administrator.
Step 2: When the Command Prompt window appears, enter:
fsutil behavior set disableencryption 0
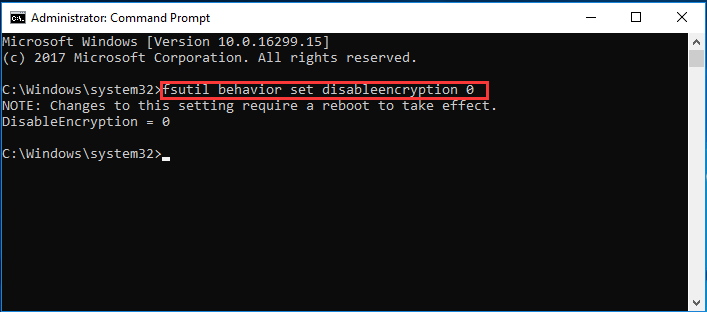
This is a command and has to be entered as it is.
To amend the changes, you need to restart your computer. So, please do that and now see whether the data greyed out problem has been resolved or not.
With the help of these three methods, you should be able to use EFS to encrypt your files and data. Just make sure that you are using Windows Education, Enterprise, or Pro edition and NTFS drive.
Other Way to Encrypt Folders or Files on Windows 10
Even after trying the three methods, if you still encrypt the grayed-out data, try using a third-party tool. The recommended file encryption software is KakaSoft. It’s a robust encrypting tool that will let you keep your data safe and secured. Being a professional tool, KakaSoft can let you lock hard drives, files, and folders use military-standard AES 256-bit encryption technology, delete unwanted files, and more.
KakaSoft makes locking files that contain sensitive and confidential data extremely easy. It is also equipped with an advanced folder, which allows you to protect and encrypt files/folders to keep the data safe from unwanted people.
Here are some of the key features of using KakaSoft:
- It is an all-in-one encryption tool that can help you secure a local hard drive, file, folders, memory stick, thumb drive, pen drive, USB flash drive, and more.
- KakaSoft operates on 256-bit AES encryption, which provides 36-degree protection to the secured folders/files. The software only allows you to access the encrypted data and no one else.
- You can remove sensitive data and unwanted files from the hard drive as well to keep them protected from unwanted access by overwriting it multiple times.
- You can add a password to a folder even in the Safe Mode. Plus, there are just a few simple steps to follow to protect a file/folder.
Now that you know about the features, let’s find out how to encrypt a file/folder/hard drive using KakaSoft. The steps are easy to follow:
Step 1: Visit KakaSoft and download Advanced Folder Encryption. After installing, begin the set-up process and let the set-up process complete.
Step 2: On the software’s main screen, you will have to drag and drop the files/folders that you want to encrypt. If not, from the top menu bar, you can choose Encrypt File or Encrypt Folder option.
Step 3: The tool will ask you to add a high-level password. You need to enter the same password twice. Think of a strong password, and don’t share it with anyone. Go to the Strength option. Here, you can choose from normal, high, and highest. In the Mode option, you can choose from Hidden and Local. Depending on how much protection your files/folder/hard drive require, you can choose an option accordingly. Finally, your data will be secured and protected.

Conclusion
So, this is it. We have shared three solutions that you can try using your Windows 10 computer to encrypt your data. If you want the easiest solution to encrypt grayed data, try using KakaSoft because it makes the encryption process straightforward and easy.