You have just copied sensitive, private information to a standard USB flash drive (or pen drive, thumb drive) and have patted your back for a job well done. But then the unthinkable happens – you lose your data, or it gets stolen. So, what happens to all your sensitive data now? In the wrong hands, this could spell catastrophe for you or your organization.
You can avoid such a scenario from happening by learning how to encrypt and lock a flash drive. So, let us show you how to do that.
Table of Contents
The Pros and Cons of USB Flash Drive Encryption
In the simplest of terms, encryption means that only someone who has a password or encryption key can access the data.
Encryption can be done be in two ways. One way is to use encryption software that comes with Windows or Mac OS or is developed by third parties.
Another way is to buy a USB pen drive with pre-installed encrypting hardware.
The pros of encrypting your flash drive
There is no doubt that if you need to use a pen drive or thumb drive, encryption is one of the best ways to safeguard your data.
- The biggest pro is that encryption makes your data safe and secure. Once your data is encrypted, it could literally take ages to guess every possible combination of the passcode or key to open or decrypt the information.
- Another pro is that with the advancement of technology, encryption is easier than ever.
- As we already know, encryption can protect sensitive data from falling into the wrong hands via loss or theft, but encryption has some other benefits too.
One of the universal truths about technology is that people will not use it if it is too hard or complicated to use, irrespective of how good your technology is.
There used to be a time when encryption used to be done only by techies well versed in cryptography. Today, encryption of computers, documents, and USB flash drives is incredibly easy. In many cases, the users themselves are unaware that they are using encryption.
Protection from data breaches – Data encryption takes care of the potential complications that come with data breaches as your data remains protected.
The data gets encrypted – This means that data is secure regardless of how it is transmitted.
The cons of encrypting your flash drive
- Encryption of a USB drive using a native encryption tool means that the decryption will only work on files on the same operating system.
- There is a way to make your data available on any OS. Still, it is a tedious process that involves partitioning your USB, making copies of your files, and encrypting each partition in a format compatible with a specific OS. Decryption requires the same encryption utility
- Another drawback of encryption is that if you transfer your encrypted files to a computer that doesn’t have the same encryption utility that you used to encrypt the files in the first place, you won’t be able to decrypt your files.
Encryption backdoors can also be introduced into software that can provide access to your data to scammers and data thieves.
There are free encryption tools that are native to Windows and Mac OS, but they are not installed by default. You will need to find them on your system and install them first before using them. The last con is not really a con but more of an additional step that you need to carry out manually.
Password Protect USB Flash Drive on Windows
Here we will show you how to encrypt or password protect a USB flash drive using both a native encryption tool and also using third-party software.
how to encrypt USB flash drives using Bitlocker
BitLocker is a Windows built-in disk utility app, you can use BitLocker to easily password protect the drive.
BitLocker a professional disk encryption tool, it can lock and encrypt a variety of storage devices, such as flash drives, SD cards, external hard drives.
It only takes a few seconds to encrypt the entire drive.
Step 1: Plugin a USB drive (a blank one). Ensure that the drive is empty by deleting everything or transferring anything that you might need to another place.
Step 2: Locate your USB drive on the file explorer
Step 3: Now, you need to right-click by tapping on the USB drive and choose the Turn on Bitlocker option. This process will begin the installation process of BitLocker, and the process will happen automatically.
Step 4: BitLocker will give you the option to decide how you will want the drive to be unlocked. So, the two options are- smart card and using a password. The “Smart card” option will be provided to those drives that have this option. Here, we will use the password option.
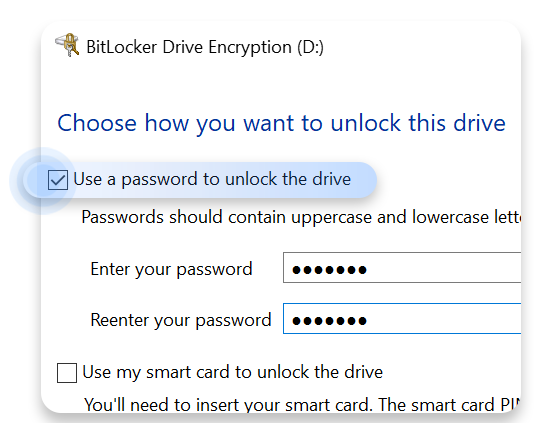
Step 5: Always choose a strong password that is hard to detect or guess. You will have to enter the password two times. Please note that the password must have numbers and lower and upper-case letters. Also, it is better to create a password that way because it becomes strong.
Step 6: Store your recovery key safely. You can choose to store it digitally as another file or print it out and keep it someplace safe. This will be your only backup option if you lose your smart card or password, making sure that you don’t lose it.
Step 7: Now, you will be shown two options – Encrypt used disk space only and Encrypt the entire drive (slower but best for PCs and drives already in use). Now, select the first option.
Step 8: Now, you need to choose your mode of encryption. If you know that the version number of Windows is 1511 or later, then select “New encryption mode.” Otherwise, you will have to go with the next option, which is “Compatible Mode.”
Step 9: Click on ‘Start encrypting,’ and your encryption is underway. Please note that the time taken for the completion of the encryption process will vary based on the USB’s size.
Congratulations on successfully encrypting your flash drive.
If, for certain reasons, you don’t want to use Bitlocker, don’t worry. We will tell you how to encrypt a flash drive without BitLocker. Read below.
How to password protect a flash drive using USB Security
When you are looking for an alternative to Bitlocker, USB Security should be your go-to encryption software. KakaSoft offers more flexibility than Bitlocker and is convenient to use.
Step 1: Download and install USB Security from our website.
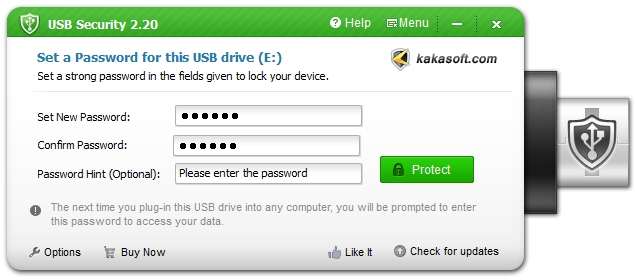
Step 2: Choose your program and select a drive to encrypt from the target drive disk that is displayed. An option to set up a password will appear, and you can now set up the password along with a password hint so that you remember the password later when you need to access the disk.
That’s about it, and you have successfully encrypted your flash drive.
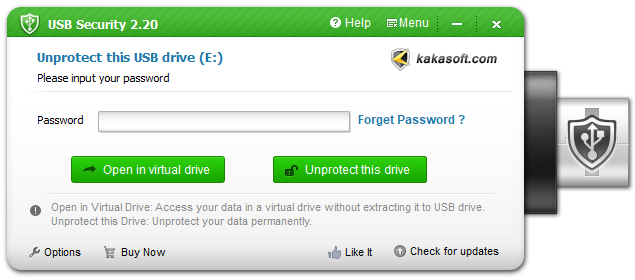
Remember to set a strong yet memorable password and keep changing your password periodically so that your password does not get compromised. Now that you have successfully password-protected the USB disk, please remember your password.
How to lock a pen drive with VeraCrypt
VeraCrypt is another great alternative to Bitlocker. Unlike Bitlocker, it allows you to choose your encryption and hashing algorithms. Just like KakaSoft, VeraCrypt is also a third-party software.
Step 1: First things first, go to the official VeraCrypt page and download and install the software.
Step 2: Connect your USB drive. Make sure that it is empty when you plug it in. Then, open VeraCrypt and click on ‘Create Volume.’
Step 3: Now, choose ‘Encrypt a non-system partition or drive’ out of the various options on the window that shows up.
Step 4: Next, choose the Standard VeraCrypt volume.
Step 5: Now, you would have reached the window with Volume Location written on the top left side. Click on ‘Select Device’ on the top right and select your USB drive from the drop-down menu.
Step 6: Since your flash drive is empty, choose the Create encrypted volume and format it.

Step 7: On this page, you’ll be able to select hashing and encryption algorithms. From the drop-down menu below the encryption algorithm, we suggest that you choose AES if you are not certain about what to choose.
From the drop-down menu under Hash Algorithm, you can choose SHA-512.
Step 8: Since you can’t change the size of your flash drive, skip ahead of the Volume Size window by clicking ‘Next.’
Step 9: Finally, it’s time to enter the password, so make sure that you enter a strong yet memorable password. A good password is a mix of upper- and lower-case letters, numbers, and special characters.
Step 10: Move your cursor on the volume format window. The progress bar should turn green. Once there, choose the format option.
Step 11: There will be a final prompt asking you to confirm the formatting. Once you do so, your drive is going to be formatted. Congratulations.
How to encrypt a flash drive using CMD (command prompt)
Here is another method to encrypt a flash drive. You can do it right from the command prompt console in Windows, and you don’t need to download anything.
Step 1: To start with, launch the pen drive and then create a folder. Give it a name and make sure that the name is free from spaces. It should be one name without spaces.
Step 2: Now that the folder is created, you need to go to the command console. There you will have to type in your pen-drive’s letter followed by “:”
For example, if your drive letter is D, you need to type in D:
Step 3: Type in “attrib<<your folder’s name>> +s +h”
Step 4: Once you are done, please go to the pen drive once again. There you will have to create a notepad. Give it a name without spaces. However, this time just adds a “.bat” extension towards the end.
For example,
If your file name is “MyFile,” you need to name it as “MyFile.bat”
Step 5: After everything is done, you need to right-click on it and then hit the edit option. Please insert the code that we have mentioned below:
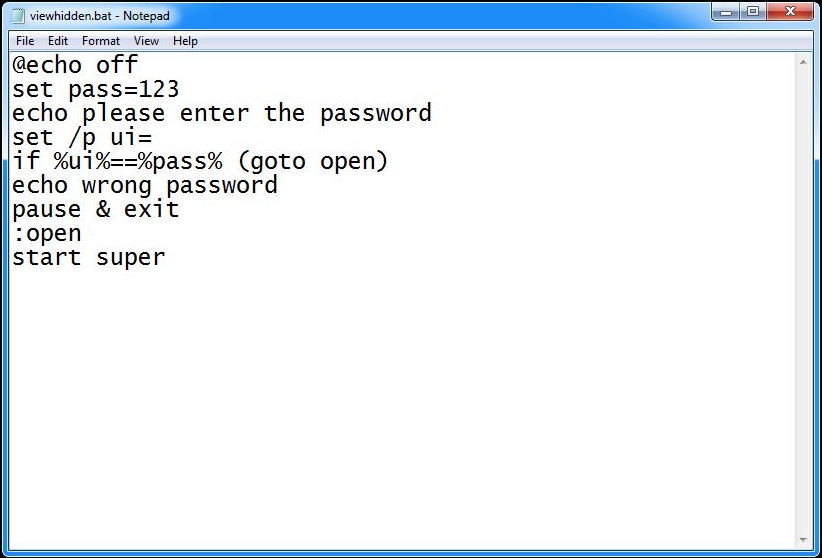
@echo off
Set pass =[ Here you give the password that you want to give for the flash drive]

echo please enter the password

set /p ui=

if %ui%==%pass% (goto open)

echo wrong password

pause & exit

:open

start super
Note: Input the password you want in the password line
Now, whenever you access the .bat file, you’ll be asked for the password. If you enter the correct password, you will be taken to your hidden folder.
How to Password Protect Flash Drives on Mac
macOS has also got built-in encryption software that you can use to password-protect your USB drive.
Step 1: First things first. You need to insert the flash drive into the Mac computer that you will be using. If there are any files in the flash drive, please copy them and transfer them to another location.
Step 2: Now, you need to open Finder. Once done, please locate Disk Utility.
Step 3: You will see the list of devices on the left side panel. Locate your device from there.
Step 4: After you have located the device, you need to hit the Erase option. You will be taken to the Format box. From there the option that you need to choose is Mac OS Extended.
You can also choose a new name for your drive now.
Step 5: Now, there will be a window that will ask you to enter a password. Ideally, you should put in a strong and yet memorable password because losing this password will make it very difficult for you to recover your files.
How to Hardware Lock and Encrypt USB Flash Drives/Pendrives?
To hardware encrypt a USB flash drive, what you can do is buy a hardware-encrypted USB flash drive. While the above three methods of using Bitlocker, MacOS, and KakaSoft are good and the most commonplace options to encrypt your flash drive, there is another ideal option. That is the hardware-based solution.
Hardware encryption results in quicker access to the data in the drive to prevent pre-boot attacks, and the encryption keys are stored on a chip. This means that you don’t need to externally store recovery keys.
While buying a hardware encrypted device, ensure that you go for AES -256 bit or FIPS – compliant software.
Conclusion
Not all USB flash drives need to be encrypted. The kind of content you have in your pen drive will decide whether you need to encrypt the data. If you have sensitive data that are part of your business, such as legal documents, company documents, etc., they should be encrypted to be safer.
However, if you have documents that are not that important, such as old music files, images, word documents, basically files that are not that valuable, you can keep them as it is, and even if you don’t encrypt them, that is perfectly fine. We hope this article will turn out to be helpful and you now have a clear understanding of how to encrypt a flash drive in Mac and Windows.