Sharing a folder in Windows 10 will allow other computers on your local network to access the files in it. By using shared folders on your local network, several computers will be able to access the same files, even with some programs collaboratively (for example, with Word or Excel). Your computers will be able to open and save files and folders, as if they were just another folder on your hard drive but located on another PC, in shared folders on your local network.
If several members of your network work or could work with the same files, you will notice that networking brings an immediate productivity increase. For example, you will avoid having duplicate files on each PC, different versions, changes made in old versions by mistake. Duplicated work due to ignorance of the progress made on another PC and many other problems caused by disorganized work.
Windows allows you to effectively limit which files and folders each user on your network can read and modify, thereby increasing security and organization.
Protect folders shared on the network is also a very important factor. If you want to grant copy-protected access to specific users and make the shared folder unavailable to anyone else, then Copy Protection Tool is the best solution. Copy Protection Tool is a recommended and maybe the only way to solve this problem. It allows you to set the different passwords and give different access permission for every group.
In the following sections, we discuss how to share a folder on network windows securely.
Table of Contents
Share a Folder in Windows 10 over Local Network
1. Create a folder for sharing
New a folder in your personal computer or a file server. Put all your folders, documents, and files that you want to share in the folder.
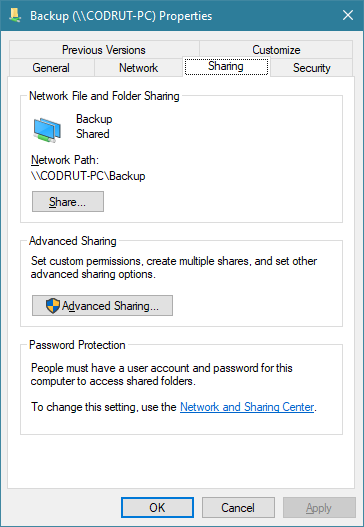
2. Right-click the folder and click Properties at the bottom of the context menu.
3. Click “Advanced Sharing…” on the “Sharing” tab.
4. Check “Share this folder” in the Advanced Sharing window.
5. Click the Permissions button to assign permissions for a user or group you want to share the folder with. The default setting permission is Read-only. Here check “Full Control” to assign full access permissions for “Everyone”. If you can’t find “Everyone”, click the “Add…” button to find it.
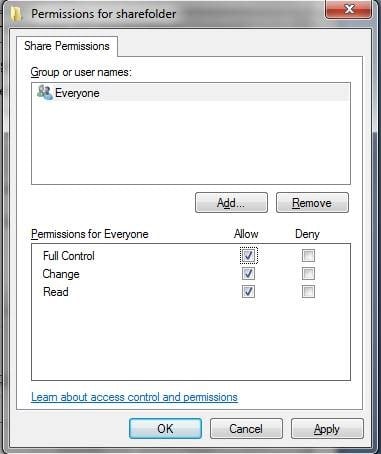
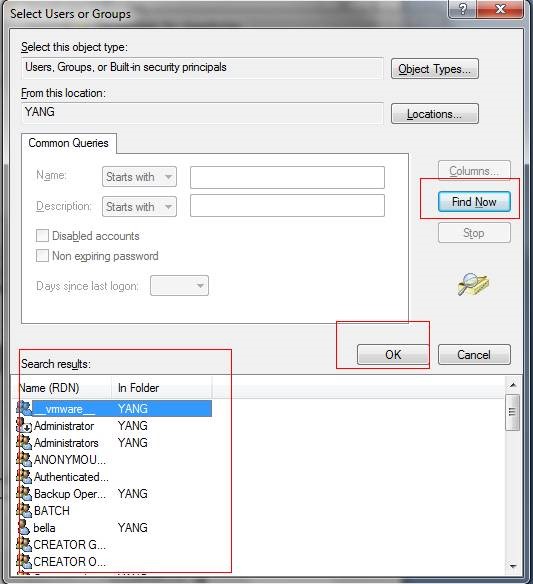
6. Click the “Advanced” button to select “Everyone” or a specific user or group you want to share the folder with.
7. Click the Find Now button, select the user or group from the search results, click OK, and return to the previous “Permissions for shared folder” Window.
8. Check Full Control for the new user or group. Click Apply and OK. Then click Apply and OK on the Advanced Sharing window.
9. Click the “Share” button on the Properties window, then choose the new user or group name from the drop-down list and click Add. Then click “Share” -> “Close,” and your folder is shared on Network now.
Password Protect Shared Folders in Windows 10?
After sharing folders over the network in Windows, the folder is basically public to all the users on the network, which is more convenient in some sense. But when it comes to sensitive information, and these shared documents are only supposed to be viewed, edited, copied, and printed by a limited scope of people, sharing those files over the local network would be a risky thing to do.
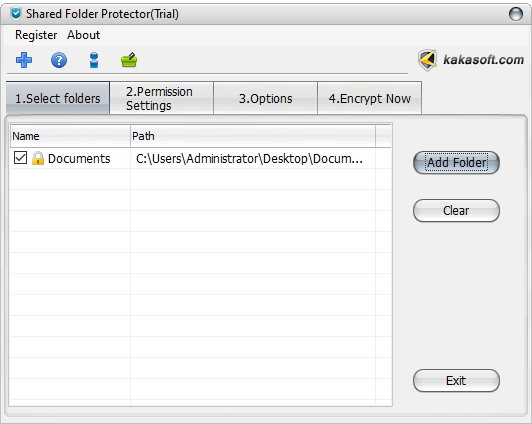
So in this case, you need a folder protection tool to password protect folders in Windows 10 along the way. Shared Folder Protector is such a tool you will find helpful in making sharing folders a worry-free thing. With just a few simple steps, the folder can be protected by a password from being illegally accessed by others.
1. Run Shared Folder Protector and add the folder you just shared from the main window.
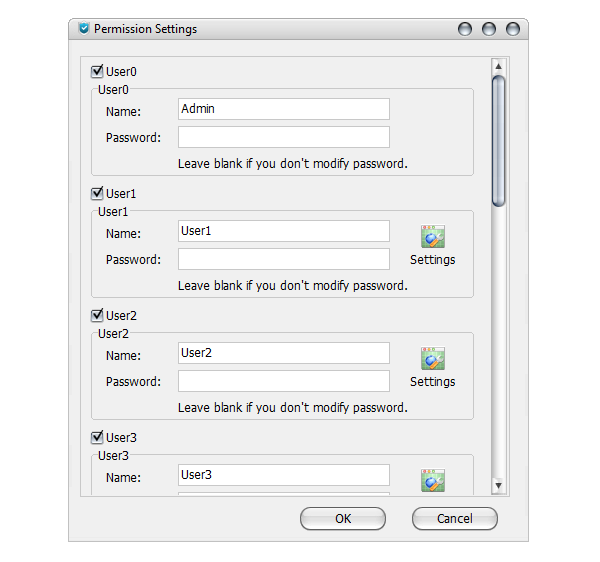
2. Click the “Permission Settings” tab on the main window to assign access permission and set passwords for users and groups you want to share the folder with. It allows you to assign permissions for up to 10 user groups.
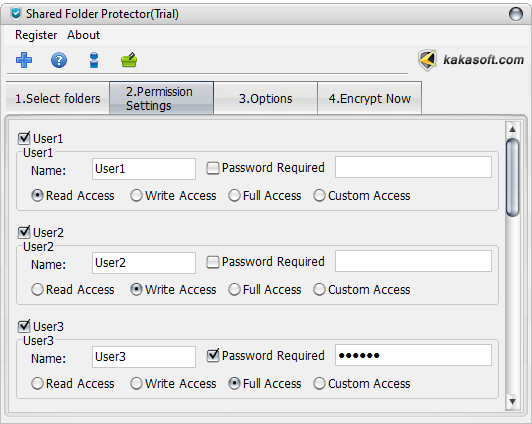
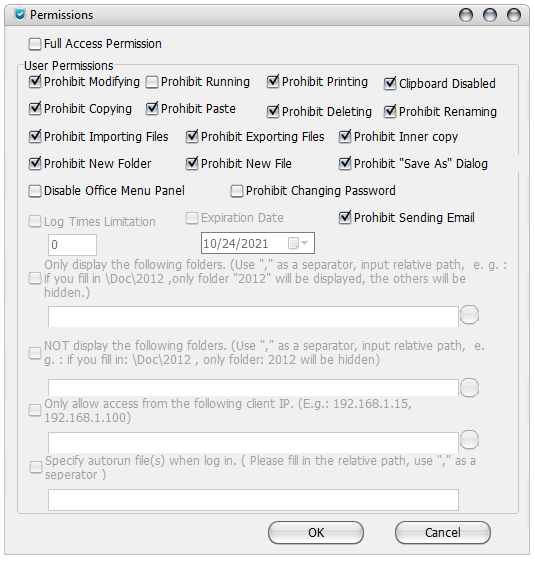
3. In addition to the Read, Write, and Full Access options, the program also allows you to customize permissions. Choose a user group and check “Custom Access” and the Permissions window is popping up.
There are 15 types of different permissions that you can assign to multiple users or workgroups. To learn detailed explanations of the permissions, you may refer to “Permissions Explanations of Shared Folder Protector“.
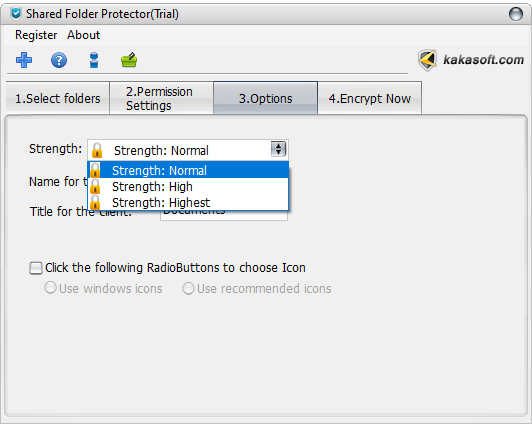
4. You can change protection strength and some minor settings on the “Options” tab from the main window.
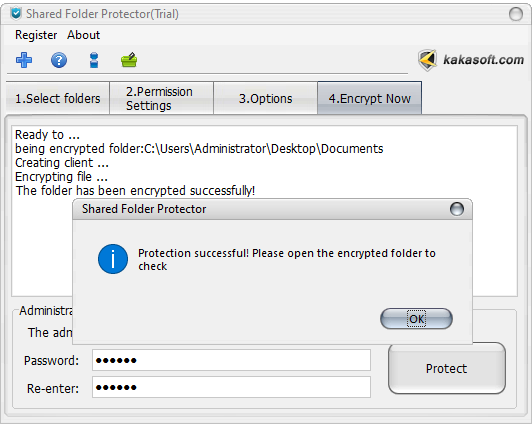
5. When all settings are suitably set, click the “Encrypt Now” tab and input your Administrator password of the program to protect the shared folder with a strong password.
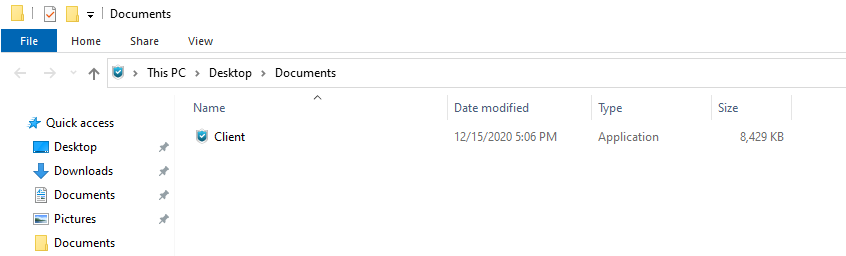
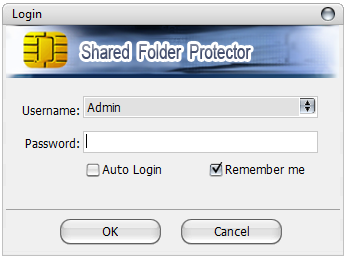
6. After encrypting the shared folder, enter Network Neighborhood on the desktop, double click the computer the protected folder is shared in, and you will find the files in the folder is hidden. Now double click the “Client” to open the login interface.
Choose your account and enter the password you set.
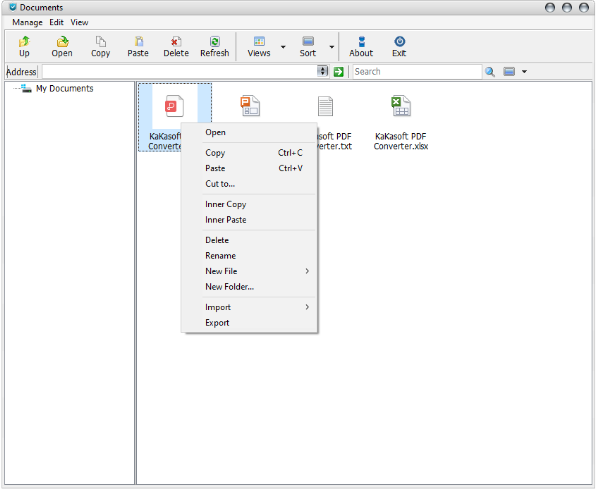
After successfully logging in, you can see the files in the folder. According to the previous settings, different accounts have different file management permissions

7. Login with the “Admin” account, choose the “manage” tab, click” Privilege Manager” to set the different user’s right here.
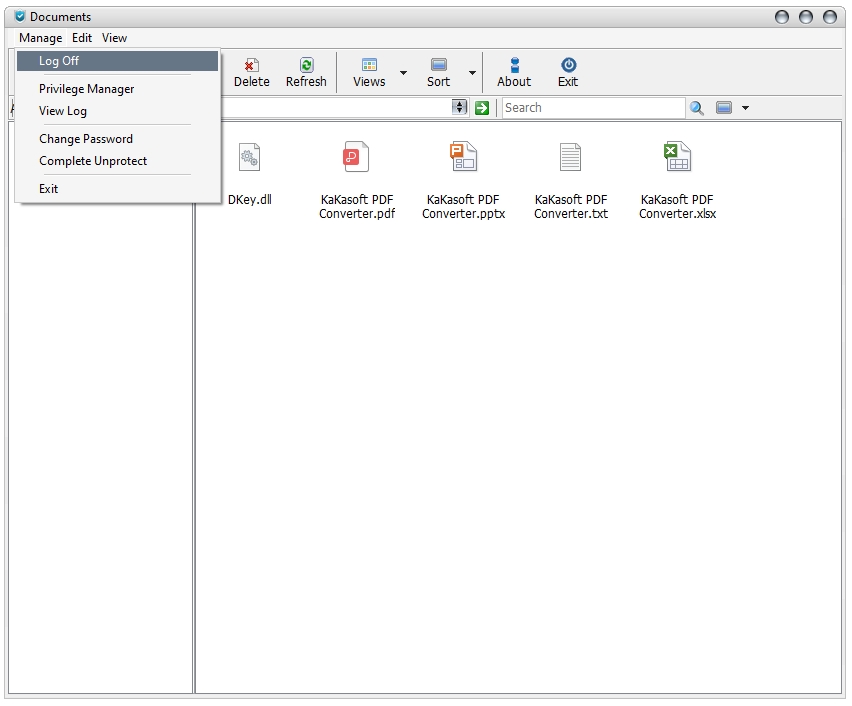
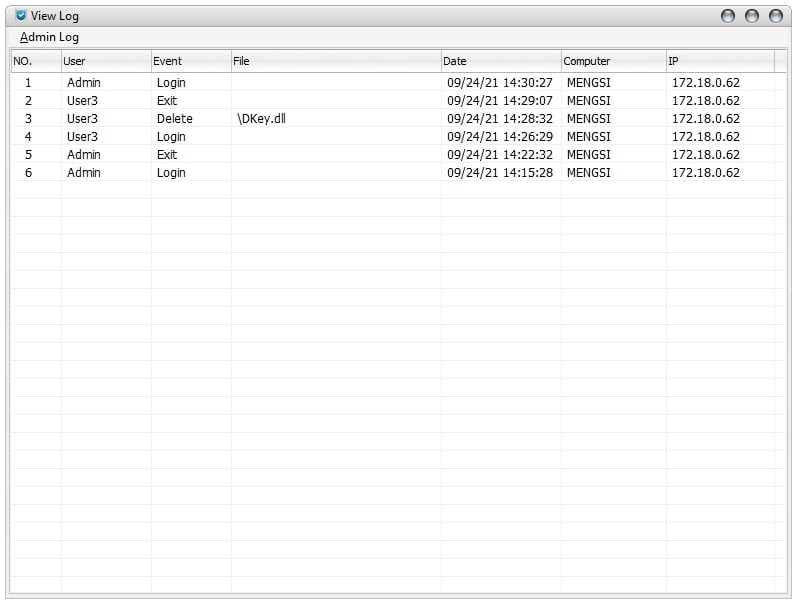
8. Click “View Log”, the visiting records will be presented in the interface.
9. If you want to unprotect the shared folder, click “Complete Unprotect” to decrypt the folder.

View and Access Password Protected Folders After Sharing
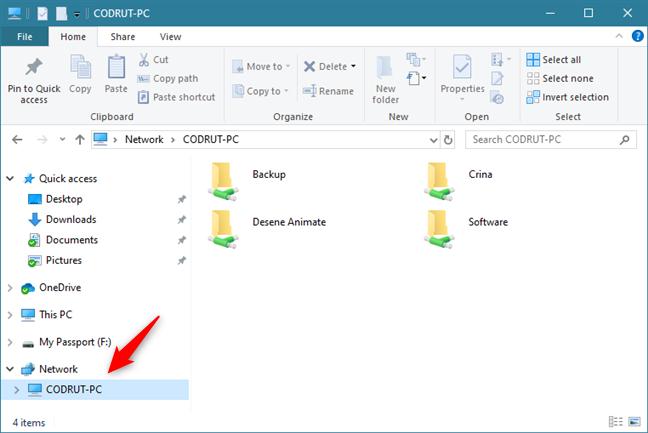
File Explorer is the best option to see the folders that you have shared using windows 7, 8.1, or 10. To see the password-protected shared folders, you have to open the file explorer. Then click on the network section. It will automatically expand. You will see the section with the name of your computer. Click on it now you will see all the shared folders with the network.
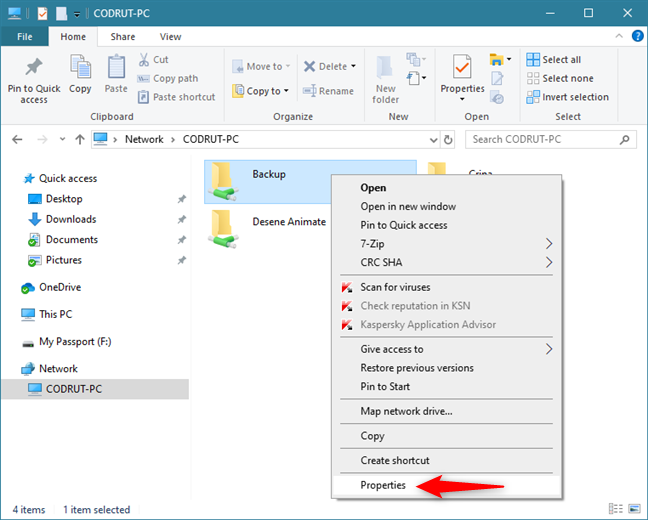
If you want to know how each folder is shared or want to see the hidden shares, this view does not help you. However, if you right-click on each folder and go to the properties, or press ALT + Enter. It will open the properties window.
Now you can see more information about the security settings, how the folder is shared, and so on.
Although this method is very simple and works well, it is not an elegant method. There are a lot of better options.
How To Share A Dropbox Folder in Windows 10
Dropbox is a relatively new tool in the market that allows you to share files promptly. It works by sending an email with a link to the recipient. The recipient can access it only if Dropbox is downloaded and logged in to their device.
In case if they do not have the tool, they can still have access to the folder in the “view only” mode. A step-by-step guide to sharing a folder using Dropbox is given below.
Through Dropbox Website
First of all, in order to share a folder with somebody, you will have to sign in to Dropbox.com and then follow the steps given below;
Step 1: Select the folder you want to share from the sidebar.
Step 2: Write the email/ group/ or name of the recipient.
Step 3: Select between the editable or only view options.
Step 4: And click the share button.
Through Dropbox Desktop App
Compared to website versions, applications are always easier to use.
Step 1: Turn on the Dropbox folder on file explorer.
Step 2: Select the folder you want to share.
Step 3: And click the share button.
Step 4: Type the recipient’s credentials.
Step 5: Choose between the “can edit” and “can view” options.
Step 6: Press share, and done.
Frequently Asked Questions About Windows Shared Folder Protection
How can I grant access to certain users and copy protect files to anyone else?
I inherited a network in which all desktops are XP Media Center and are not on a domain. I have one user who needs to share some very sensitive information with two other users. Currently, the PC is set up just to share the folder thus making it visible (and available) to anyone on the network. How can I grant copy-protected access to the two users and make the shared folder unavailable to anyone else?
Is it possible to copy protect all media files shared on Network?
“I have a file server on the network (FTP not Lan) and have about 10GB of files to share. I want to share certain files with certain people. Someone told me that I can use a third-party tool to password protect shared folders and files. But the trouble is none of the known tools support all media formats. Is there a complete solution that will help me? The media files are PDF, Flash, Video, DVD, Image, Photo, MS Office Documents, etc.”
The answer is “Sure” to both of the two questions. Hereby will show you two effective ways to copy-protect data and files shared on Lan Server. The following are step-by-step solutions. But the first way is not as liable as the second one. And we have not yet tested if the first way is available for all media files. But the second solution can copy-protect all media files shared on Lan or network. Readers may try both and adopt a proper solution for their final usage.
1. Activate the Guest account and put a password on it.
2. When creating the shared folder, put a “$” following the share name. Though it shows up in “my network places”, when access is attempted from any pc, an error message states that the resource is not available (this is good).
3. When you try to access the shared folder by doing Start>>Run>>\\pcname\share, you are denied access. However, if you do Start>>run>>\\IP Address\share, you are prompted for a password (this too is good). But after a successful username/password, it will tell you the drive cannot be found.
Way II: Copy Protect Files Shared on LAN with a Copy Protection Tool
Above is a manual but no reliable way of copy protecting data and files in a shared folder. There, especially for enterprise users, if a company or team has different workgroups and wants to specify access permissions for each group, it is impossible to achieve by the above way.
The recommended and maybe the only way is using a third-party shared folder copy protection tool that allows you to set different passwords and give different access permission for every group. Read the following tips and you may learn more about how to copy-protect files, data, documents, photos, video, pictures, images on LAN servers or USB drives.
What is multi-user permission of password protected file sharing?
There is a folder or file on your computer. You, the Administrator have full authority to read, write, modify, copy, print, and even delete it. When you sharing the file or folder on LAN, you usually don’t want others to do all that you can to it.
If you share the file in your office workgroup, you might want your leader to read, copy and modify the file while your assistant read and print it. For other group members, you just want them to read it. Then, you need to find a way to help you set access permissions for different people and it is multi-user permission.
How to set multi-user permission for sharing file in Windows?
Here KakaSoft Password Shared Folder will completely meet your needs. It is able to password protect shared folders and files with advanced encryption algorithm techniques. And, the very particular feature is it supports 15 types of multi-user permission settings.
You can set read, copy, write, modify, delete, print, etc. permissions for different users and groups. This feature is unique in the password shared folder field. This program is compatible with both Windows 10/8/7 32 bit and 64-bit systems. What’s more, it also supports Windows Vista, XP, 2003, and 2000 editions.
Conclusion
I hope after reading this guide, you must have learned “how to password protect shared folders on the network.” It will also help you to protect folders shared on the LAN network. And Shared Folder Protector by KakaSoft is undoubtedly your best choice to protect shared folders. You have also learned how to view and access shared folders on windows. And have learned How to Share a Dropbox Folder in Windows 10. All these methods will help you in sharing folders during daily home and office work. Please follow all these steps carefully, because if you miss anyone, this will not work as you expect.