With the popularity of social network tools such as Twitter, young people on the internet are prone to communicating through more images. On the other hand, people store personal and family photos and business data in their computers and USB drives. All these photos and cooperate documents are facing the threat of illegal copy and distribution so that they need urgent copy protection.
Image file has the feature of small in size but contain a lot of information, therefore if you keep them open and unprotected they may be copied and illegally used by a cyber criminal. Copyright protection is a disputable issue currently and people are trying their best to guard their picture copy protection and other media copy protection with a not that much effective results.USB Copy Protection is a copy protection software designed for copy protecting a wide range of main media formats including images and pictures Windows 10/8/7. When carrying and transferring data from one PC to another with USB drives you are able to supervise all access permissions.
Download USB Copy Protection, and learn to copy protect images step by step
Table of Contents
Step 1 Install USB Copy Protection on Your PC
Open the exe file you’ve downloaded now, and then install the program on your computer according to the Setup Wizard. Next, connect your USB flash drive to your PC, please make sure the images need protection are copied to the disk.
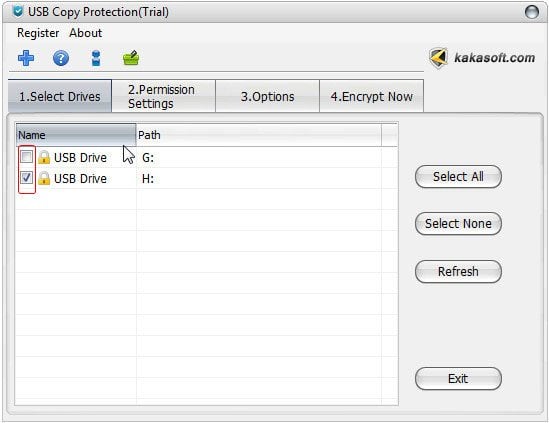
Step 2 Select a Drive to Copy Protect
When you install the program, you are required to select a drive to copy protect, navigate to “Select Drives” option and then select the drive you wish to lock in the protection list.
Here you can select more than one drive and start to protect copyrights for images, which includes photo copy protection, jpg copy protection, gif copy protection and so on.

Step 3 Make Settings and Assign Access Permissions
Click on “Permission Settings” button on task bar to proceed. Here you can disable or able a specific access permission to different user by checking on “Red Access”, “Write Access”, “Full Access” according to your need, or you can check on “Custom Access” to customize up to 15 access permissions by yourself.
In the customizing window, you can also limit access permission of a user via different ways, which include limiting log times, setting expire date, display files in a certain format and other methods.After your setting click on “OK” to proceed.